OK... so the front sway bar saga has an update... After scouring craigslist and ebay for either an after-market bar or a used factory unit, I found a correct small-body bar in up-state New York. Turns out a guy on the AMCForum ( http://theamcforum.com/ ) message board had one from a part-out. I sent him the money via paypal and he shipped UPS...
The bar and brackets were pretty rusty, but solid. I took a brass wheel to them and got the bulk of the scale off. I took everything to work today to put the parts through the tumblers. The brackets went into the small tumbler with steel shot, Pretty aggressive media.They cleaned up really well. The bar was too big for the small, round tumbler, so it went into the big, oval unit. We use ceramic media in the big tumbler. Not as aggressive, but it did a pretty decent job. I brought them home and applied two coats of Rustoleum primer and two coats of gloss black. The finish isn't perfect, but when you consider where a sway bar lives, perfect won't stay that way for long.
I have what I believe to be correct 15/16" polyurethane bushings on order. The bushings are listed as a Javelin part, but AMC did a lot of parts-bin engineering. The brackets bolt to the subframe rails via 5/16-18 nuts set inside the rail. I'll use grade-8 fasteners, although it may be overkill. I have the end-links and bushings already, so this should be an easier install than the rear bar (famous last words).
I'll post pictures in a bit. I wish I would have taken pix of the bar and brackets in their "rough" state, but I'm not that clever. So it's officially time to cancel the back order with Jegs...
Well, Jegs finally received confirmation from ADDCO that the bar was still back-ordered, so Jegs refunded my Paypal account and cancelled the order. I tried to test fit the brackets, and couldn't get the bolts to thread. After confirming that the inserts are indeed 5/16-18, a forum member suggested that I chase the threads to remove any grime, grease and rust that may have settled in the threads. Brilliant idea... except that when I went to chase the last thread (the first 3 cleared beautifully), I found a broken bolt in the last hole. DOH!
So it's off to Sears to get Easy-Outs...
Wish me luck, I'll need it. The other option is drilling it out and re-tapping... thanks, but no thanks.
If you hear swearing coming from the general direction of Painesville, Ohio, that will be me...
Friday, July 29, 2016

Sunday, July 17, 2016
Rear swaybar
I got some time to myself... so I spent it under the Hornet. Nothing like being horizontal, on a sheet of cardboard, on a sunny driveway. The rear sway bar was calling my name, so I listened... Here's what it said... "install me, install me, install me...". So I did.
The bar itself is an ADDCO unit, number 915. This is a 3/4" piece that is designed to go over the axle, and has a "V" bend to clear the pumpkin ball. Here is a shot of it under the axle in it's relative position...
 The instructions (printed instructions plus a crude pictograph) say to block the right tire and jack-up the left side, then thread the bar over the driveshaft and "ahead of" the tail pipe. Evidently, the technical writer and I have a different definition for "ahead of". After 15 or 20 minutes of jimmying the bar around and hitting obstacles, I sat back and reconsidered "ahead of". After burning a few spare brain cells, I decided to try a different "ahead of", and she slid right into place. Technical writer: 1, Gregg: 0.
Just an FYI... if you buy an ADDCO bar second-hand, Jegs has pdf's of the instructions on their web site. You just need the ADDCO item number.
If you take the time to pre-assemble the bar links, it is useful during the installation. Threading the bar mount bushings over the bar eyelets before snaking it over the driveshaft will be useful as well.


Next up I loosely assembled the end-links to the leaf spring, as close to the spring plate as possible aft of the axle. I tightened everything snug but not to final tightness. The bar-to-chassis mounting HAS to be done with the car on its wheels. I removed the left rear tire to insert the bar, so I put the tire back on and lowered her off of the stand.
Guess what? There is no room for a real person to work under a Hornets' rearend! Expect to hit your forehead on the pumpkin ball frequently. Also expect to need additional bends in your forearm and biceps. I have neither. To attach the bar to the frame, you need to drill two 3/8" holes in the frame rail on each side. There are square shoulder "U" bolts that have to be threaded up, into the frame cavity, then back down into the daylight. This is as much fun as it sounds like. I ended up having to elongate all four holes to make it work. I did the passenger side first (for no real reason) and it went pretty well after elongating the holes. The drivers side proved a greater challenge. First because I had to remove the shock (Hornets have staggered shocks). Second because I didn't elongate my holes quite enough, and the "U" bolt got stuck in no-mans-land. I couldn't push it through, and I couldn't pull it back out. I didn't panic, but I considered it! Eventually, after much not panicking, I got it in place and snugged the fasteners.

Once I was satisfied that I had everything lined-up and where I wanted it, I tightened all of the nuts to what felt like the correct torque. The instructions don't give torque values (and have a "we're not responsible" disclaimer), so I tightened by feel. In other words, until they wouldn't move, plus an extra grunt.
I haven't test driven it yet, but the factory performance oriented Hornets had a similar bar... so it's gotta help, right?
The bar itself is an ADDCO unit, number 915. This is a 3/4" piece that is designed to go over the axle, and has a "V" bend to clear the pumpkin ball. Here is a shot of it under the axle in it's relative position...
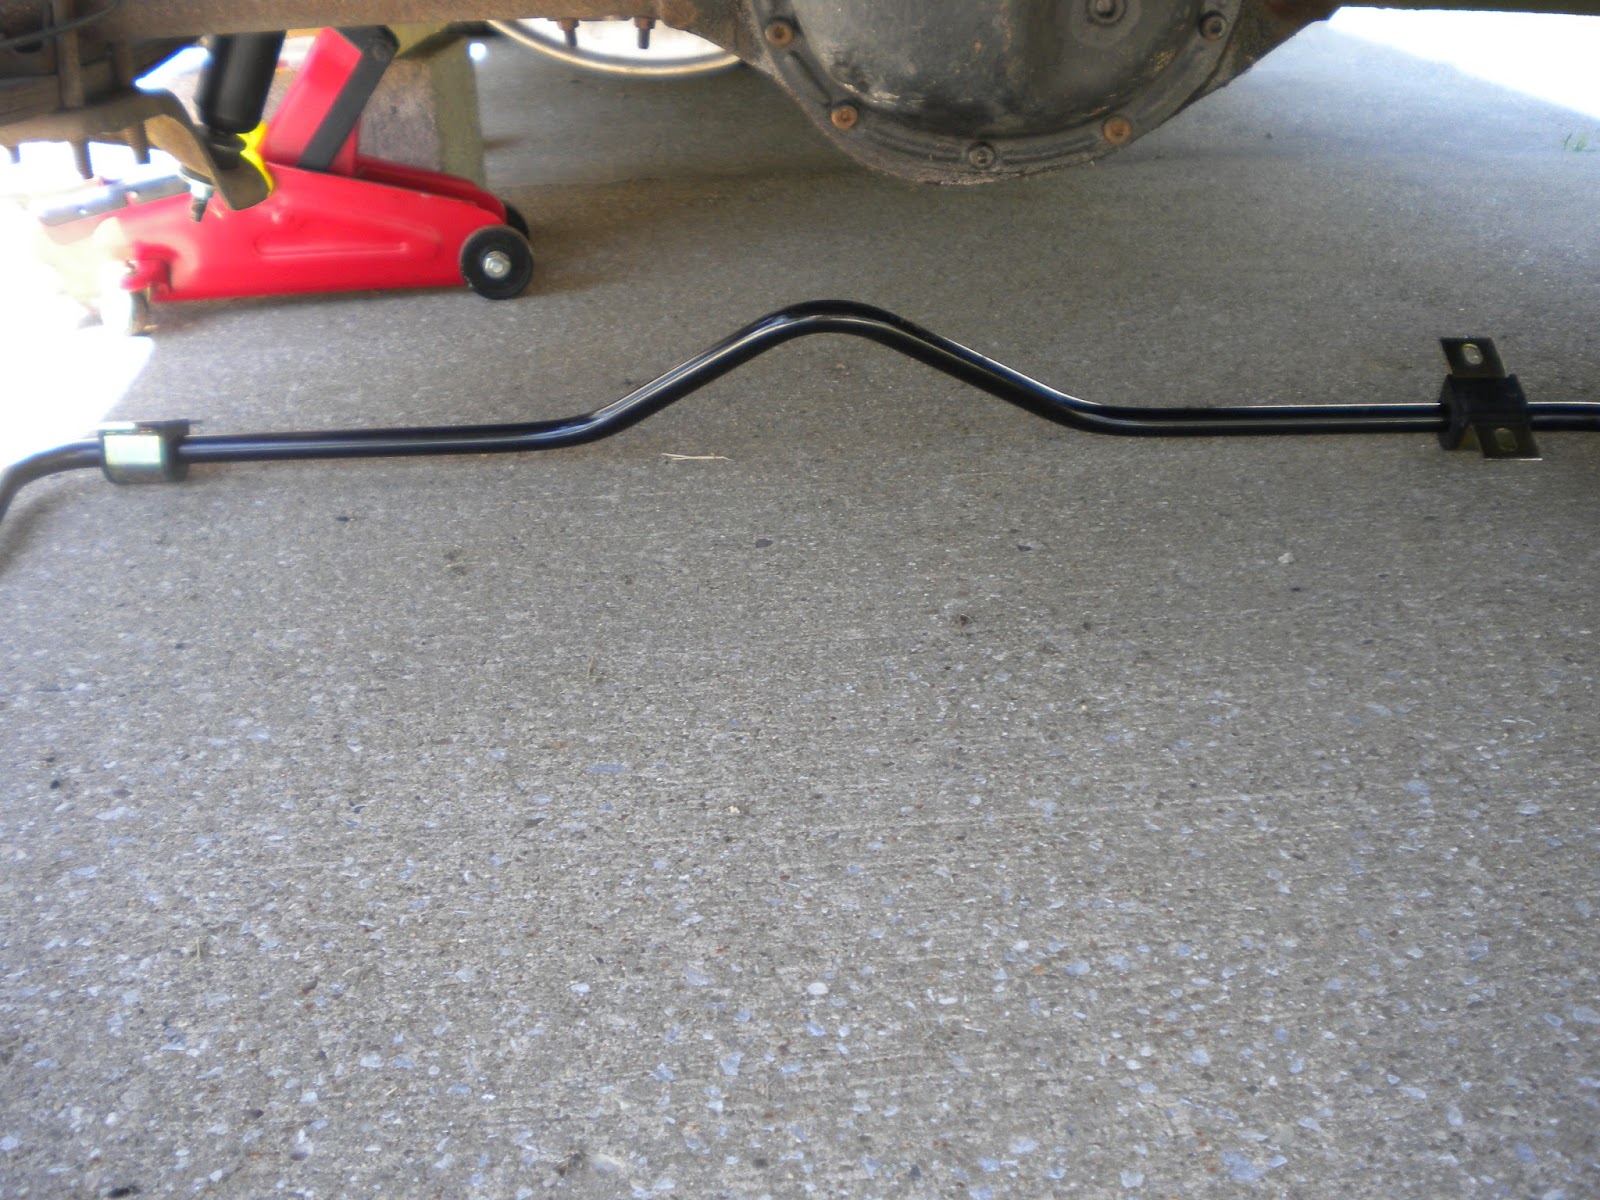
Just an FYI... if you buy an ADDCO bar second-hand, Jegs has pdf's of the instructions on their web site. You just need the ADDCO item number.
If you take the time to pre-assemble the bar links, it is useful during the installation. Threading the bar mount bushings over the bar eyelets before snaking it over the driveshaft will be useful as well.


Next up I loosely assembled the end-links to the leaf spring, as close to the spring plate as possible aft of the axle. I tightened everything snug but not to final tightness. The bar-to-chassis mounting HAS to be done with the car on its wheels. I removed the left rear tire to insert the bar, so I put the tire back on and lowered her off of the stand.
Guess what? There is no room for a real person to work under a Hornets' rearend! Expect to hit your forehead on the pumpkin ball frequently. Also expect to need additional bends in your forearm and biceps. I have neither. To attach the bar to the frame, you need to drill two 3/8" holes in the frame rail on each side. There are square shoulder "U" bolts that have to be threaded up, into the frame cavity, then back down into the daylight. This is as much fun as it sounds like. I ended up having to elongate all four holes to make it work. I did the passenger side first (for no real reason) and it went pretty well after elongating the holes. The drivers side proved a greater challenge. First because I had to remove the shock (Hornets have staggered shocks). Second because I didn't elongate my holes quite enough, and the "U" bolt got stuck in no-mans-land. I couldn't push it through, and I couldn't pull it back out. I didn't panic, but I considered it! Eventually, after much not panicking, I got it in place and snugged the fasteners.

Once I was satisfied that I had everything lined-up and where I wanted it, I tightened all of the nuts to what felt like the correct torque. The instructions don't give torque values (and have a "we're not responsible" disclaimer), so I tightened by feel. In other words, until they wouldn't move, plus an extra grunt.
I haven't test driven it yet, but the factory performance oriented Hornets had a similar bar... so it's gotta help, right?
Wednesday, May 25, 2016
Not an air shocks fan, so...
Took a little time to get started, but I've finally taken some baby steps. I replaced the rear air-shocks that a previous owner had installed. I know there are lots of folks who swear by them, but I'm in the "unit-body cars are not meant to have weight carried by the shock towers" camp.


The ass-end now rides on KYB Excel gas shocks. I have KYB Gas-A-Just units for the front. That will be part of the rebuild of the front end. As a side note, I have discovered three new ways to hit my head... 1/2" drive ratchet handle, left to swing in gravity's own arc, scootching under the car and conking myself on the tailpipe, and scootching out from under the car and conking the bumper extension... Three for three...!

I took a calculated risk by buying 1" wheel spacers before actually doing the math (which means they won't work) to test fit the Mustang Bullitt rims on the drivers side. I think they will look very at home in the Hornet wheel arches once we get rid of the "baja" look. There is entirely too much room in the wheel wells as it sits. If I can get 2 inches of drop in the back and maybe 2-1/2 or 3 in the front, she should sit down over the 245/45's pretty nicely.


Posted a few pics for your perusal...


The ass-end now rides on KYB Excel gas shocks. I have KYB Gas-A-Just units for the front. That will be part of the rebuild of the front end. As a side note, I have discovered three new ways to hit my head... 1/2" drive ratchet handle, left to swing in gravity's own arc, scootching under the car and conking myself on the tailpipe, and scootching out from under the car and conking the bumper extension... Three for three...!

I took a calculated risk by buying 1" wheel spacers before actually doing the math (which means they won't work) to test fit the Mustang Bullitt rims on the drivers side. I think they will look very at home in the Hornet wheel arches once we get rid of the "baja" look. There is entirely too much room in the wheel wells as it sits. If I can get 2 inches of drop in the back and maybe 2-1/2 or 3 in the front, she should sit down over the 245/45's pretty nicely.


Posted a few pics for your perusal...
Tuesday, May 3, 2016
Inside... a mixed bag...
When I bought the Hornet, the previous owner had replaced the carpet with a decent fitting, black after market piece. The back seat is from a '77 AMX and he had died the old tan dash and door cards black. So far, so good. The under-hatch area was untouched, and missing most of its factory panels, including the carpeted plywood "floor".


Since this is more of a "build" than a "restoration", I decided to just fabricate some basic, lightweight panels to give it a semi-finished look. I used 1/4" Luaun that I cut to shape and covered it in generic black automotive fabric. Contact cement is a beautiful thing. The sheet metal got two coats of rattle-can truck bed spray. The old weather seal in the hatch was powder, so I got a replacement from www.weatherstripspecial.com , it fit like a glove and I only had to trim 1" to butt the ends. I ran out of Fall, so the plywood floor goes in shortly and I need front seats. The factory units are toast, so I'm looking at newer seats as a "make-fit". I'm eye-balling some Passat seats on Craigslist. Dark grey fabric, manual adjust with lumbar... we'll see...

I'll update with a few more pics when the interior is in nearly complete condition...
UPDATE: the Passat seats won't work with the AMC seat tracks... very different design. I did get to spend an hour talking cars... still worth the trip...


Since this is more of a "build" than a "restoration", I decided to just fabricate some basic, lightweight panels to give it a semi-finished look. I used 1/4" Luaun that I cut to shape and covered it in generic black automotive fabric. Contact cement is a beautiful thing. The sheet metal got two coats of rattle-can truck bed spray. The old weather seal in the hatch was powder, so I got a replacement from www.weatherstripspecial.com , it fit like a glove and I only had to trim 1" to butt the ends. I ran out of Fall, so the plywood floor goes in shortly and I need front seats. The factory units are toast, so I'm looking at newer seats as a "make-fit". I'm eye-balling some Passat seats on Craigslist. Dark grey fabric, manual adjust with lumbar... we'll see...

I'll update with a few more pics when the interior is in nearly complete condition...
UPDATE: the Passat seats won't work with the AMC seat tracks... very different design. I did get to spend an hour talking cars... still worth the trip...
Wednesday, April 20, 2016
1975 AMC Hornet... not much, but she's mine...
 I've wanted a project for quite some time... and I'm a Rambler guy. Chevy guys are cool... I have no issues with the Blue Oval crowd... and the Mopar folks have taken the orphan AMC brand into their shows... but it takes a special kind of crazy to love the Kenosha Kadillac.
My little Hornet hatch is a base model. Originally tan, but after a couple DIY spray jobs, she's now a very orange-peel turquoise. That is the least of my worries... lots of mechanical stuff to do. The venerable AMC in-line 6 provides motivation (this is the 232 CI variant). The Mopar sourced 904 TorqueFlite automatic connects to a leaf-sprung AMC-15 one-legger rear end.

A brief list of To-Dos:
1. fix leaky trans pan
2. re-build front suspension
3. disc brake upgrade
4. add front sway bar
5. install KYB gas shocks all-around
6. fit Mustang Bullitt 17x8 wheels over new brakes

I'm tired just thinking about it.
It's going to be a busy Spring, but I can't wait to get her out of storage in about a week. Hopefully, I can get a few folks to follow along. The advice and encouragement will be vital when the going gets tough.
Subscribe to:
Posts (Atom)